Deciding to make the purchase
I've been thinking about building my own computer for the past few years, but was hesitant to do so until two things happened last week. First, I tried out the Unity Engine on my laptop which took forever to render and crashed during the tutorial; and secondly, I got my first paycheck. My laptop has served as my sole coding and development platform for the past five years, but this can't continue if I'm to do any graphics processing. I already knew this from my 18fps frame rate playing Fortnite, but that's not exactly a legitimate reason to splurge on a new PC. I want to experiment with animation, OpenCL, and game development during graduate school, and require more processing power in order to do so. I gave myself a strict $1000 budget, and set out to build the best PC I could for the money!
Useful tools
I've built several PCs before for the TARS research group, but going into this design project I had zero prior knowledge of component pricing, vendor quality/reliability, or "ordinary" performance specifications. In order to get some background, I scoured r/buildapc, r/buildapcforme, and r/buildmeapc for some example builds. Tom's Hardware had answers for all my basic questions, from screen types to memory transfer protocols. PCPartPicker was great for estimating power usage and ensuring parts were compatible. Lastly, UserBenchmark allows you to directly compare the performance of any two CPU/GPU/HDD/SSD/RAM options, and I used it heavily to determine which upgrades were worth the money. The best deals on parts seemed to be found on Amazon and NewEgg, and r/buildapcsales was helpful as well. If you're purchasing from NewEgg, I would recommend that you avoid 3rd party vendors and only purchase parts shipped and sold by NewEgg.
Parts selection
CPU/MOBO: After careful consideration, I decided to go with AMD over Intel. Their $150 Ryzen 5 2600 CPU has better multi-threaded performance than Intel's comparable i5 9400f processor, and a cheaper accompanying motherboard. I decided against the Ryzen 2600X because although it's faster, it's much less efficient and would require more power and cooling. The next generation of Ryzen processors are coming out in another week (the 3600 is $200), but they work optimally with the new x570 motherboard, which is over $200. I chose the B450M Gaming Plus ATX motherboard, which is now $100 since I waited too long for the $85 deal. I probably could update the BIOS and get it to work with the Ryzen 3600, but I'm not willing to risk this in my first build.
GPU: AMD won again, this time over NVIDIA. In the mid-budget range, the Radeon RX Vega 56 provides more power than NVIDIA's GeForce GTX 1080 Ti. As an added bonus, GSync monitors are generally cheaper than FreeSync monitors. I wasn't aware of this at first, but monitors are frequently only compatible with a single GPU manufacturer's GPUs (GSync with AMD and FreeSync with NVIDIA). Plus, I've had enough of programming in CUDA for the time being and would like to try OpenCL.
Monitor: My build differed from most others in that I required a monitor as well. I eventually decided on the 24" Optix G24C, which offered all the gaming perks of 1ms delay and 144Hz refresh rate while maintaining a 3000:1 contrast ratio. It's better than I strictly need, but why restrict myself to 60fps when I have the extra processing power?
RAM: There were lots of quality options for 2x 8GB DDR4 RAM in the $60-80 range, from brands like GSkill, Corsair, and GeIL. Ultimately, I went with the one which had the best color. I know there's no reason for my PC to be color-coordinated, but I'm vain and had no better way to decide on this one.
SSD: This choice was more difficult than expected, since I originally planned on grabbing the cheapest 500GB SSD I could. Instead, I got to learn all about the timing differences of SATA III, PCIe, and NVMe. I ended up deciding to pay the slight premium for an NVMe drive.
HDD: Who needs a hard drive? This will be easy to add later if I find myself running out of storage on the SSD. Given that I've barely used 100GB on my laptop after five years, I think I've got some time on this one. That being said, using Unity and such, things can probably get out of control pretty fast.
PSU: I decided to go with a 650W gold-rated 80+ PSU, since a good PSU will allow room for future upgrades and save money in the long run due to increased efficiency. If you're run a 500W PC at full steam 24/7 for $0.20/kWh, you'll save just over $80 after a year of using a 90% versus an 80% efficient PSU.
Case: I was surprised at how much these pieces of plastic cost, so I tried to spend as little as possible. I got a cheap case which had plenty of room and good ventilation.
My build
| Component | Model | Price |
|---|---|---|
| CPU | AMD Ryzen 5 2600 6-core | $150 |
| MOBO | MSI B450 Gaming+ ATX | $100 |
| GPU | Sapphire Vega 56 8GB | $300 |
| Monitor | MSI Optix G24C 24" | $170 |
| RAM | G.SKILL Ripjaw V 2x 8GB | $70 |
| SSD | WD Blue NVMe 500GB | $65 |
| HDD | none | $0 |
| PSU | EVGA Gold 650W ECO | $83 |
| Case | Corsair Carbide Mid-Tower | $48 |
| Total | $986 |
After ordering all the parts for my PC, I received them at work over the course of the next week. Finally, all my parts had arrived and I was ready to start building! The instructions shipped with my parts were incredibly lacking, so I was glad to have some prior experience building PCs. Upon starting my build Friday evening, I expected everything to go smoothly and to be stress testing my new workstation later that night. Alas, I wasn't to have a working computer for more than a week!
The first step which gave me difficulties was installing the RAM. Each stick didn't go into the requisite slot as smoothly as expected, so at first I was too gentle and hesitant to force it into place. After a few minutes of quadruple-checking the orientation, I finally worked up the nerve to muscle it into place.
The next difficult step was installing the CPU and heatsink. The CPU connects to the motherboard with hundreds of small pins, and it's critical to drop it directly into place without exterting any shear stress, or else you'll bend a tiny pin and have to buy a new CPU. Despite the inherent risks, this step is not too difficult as long as you're careful, and I installed it into place with no difficulties.
Attaching the heat sink was another story. The heat sink for my build was unlike any I had seen before, and needed to be screwed into place instead of using a simple latch system. Screwing two components together sounds simple, until you realize that the heat sink was spring-loaded (to ensure consistent contact with the CPU), the motherboard is just a few millimeters thick and cannot be bent, the holes didn't line up quite right, and that most of the motherboard's surface contains chips and wires that should not be touched, in case static electricity from my fingertips fries a crucial subcircuit. As a result, I spent the next half hour wrestling with both components, putting way more force on the motherboard than I was comfortable with. Eventually, I got the heat sink installed correctly, but wasn't confident that I hadn't broken anything in the process.
Everything proceeded smoothly from there, and eventually it was time to turn on my build. I took a deep breath, paused, and hit the power button... Nothing happened. After a few worried seconds, I realized that the power supply wasn't turned on. Relieved, I flipped the switch and tried again. This time, I heard a sound like a gunshot, and blue sparks shot out the bottom of my case! Quickly -- before my apartment caught on fire -- I killed power to the system. What had I done wrong? Did I just fry my entire system? It looked like the explosion came from my PSU, so I removed it and took a closer look. The PSU is literally a black box, with warning stickers saying that any tampering will void your warranty and to never take it apart under any circumstances. After flipping it upside-down to see if I could do just that, a small screw fell out. Maybe that had caused a short-circuit? I plugged it back in and tried again. BANG! Another explosion! Did I break it for real this time? I inspected the motherboard, which didn't show any signs of scorching. Hopefully all the damage had been contained within the PSU.
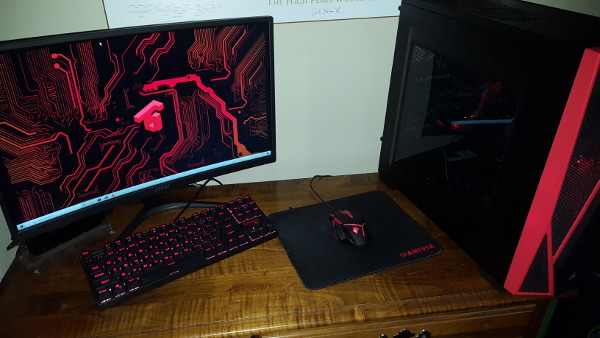
At this point, I began searching Reddit for advice. Ironically, the front-page question in r/buildapc was "How do I ensure my PC will work correctly before turning it on? Do I just hit the power button and pray everything works? What if a broken PSU fries the whole system?" The top answer reassured the OP that broken PSUs are such a rare problem that they're virtually nonexistent. Of course, that means it's exactly what would happen to me. After listening to other people's advice, I ended up contacting Amazon and EVGA and having a new PSU shipped to me. One unbelievably long week later, it arrived. Racing home from work, I immediately wired it up, plugged it in, and turned on my PC. To my immense relief, everything worked! No explosions this time! After setting up my desired operating system (Ubuntu) alongside a free version of Windows 10, I was finally ready to roll! Here's what my final build looked like:
I have to admit that I half-expected my PC to explode every time I powered it on for the next few months, but it's been doing great ever since!